
Who this is for: Komodo admins, such as your wellbeing lead, senior leaders, or IT and data manager.
When to use it: when your school first joins Komodo, and at the start of every school year.
How to use it: work through each step in order and tick off each task. The explanation for each task sits directly underneath it.
Step 1: Choose how users get into Komodo
☐ Pick your import method
- Wonde (recommended): syncs students, staff and groups from your SIS every week, and removes leavers automatically.
- CSV upload: a spreadsheet you upload and update by hand. Use this only if Wonde doesn't support your SIS.
☐ Stick to one method
- If you use Wonde, don't also add users by CSV or by hand.
- Wonde treats your SIS as the master copy, so anyone added outside it can be removed at the next sync.
☐ Wonde only: ask IT to approve Komodo
- Tell your Komodo contact who manages your SIS. Wonde will email them an approval request.
- IT must approve every data permission. Anything left pending won't sync.
- You can check for outstanding permissions on the Integrations page.
Step 2: Set up users and groups
Why groups matter: staff and admins only see students in the groups they belong to. Surveys are also sent by group and year. For step-by-step help, see Managing users and groups.
☐ Import your users
- Wonde: go to Settings → [Your SIS] Import, click Refresh SIS data, choose groups on the Groups tab, check the Users and Errors tabs, then click Save and Sync.
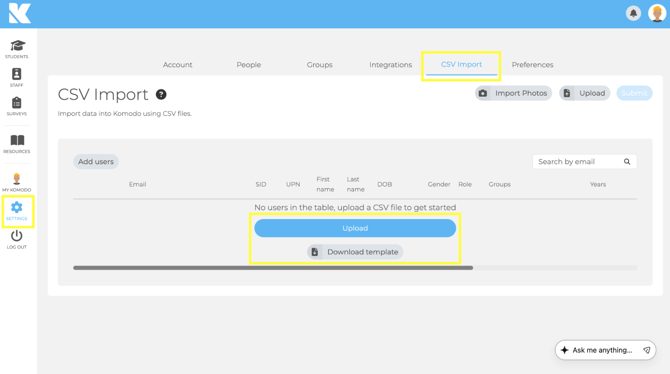
- CSV: go to Settings → CSV Import and download the template. Fill in First Name, Last Name, Email, Gender, Role, Year and Group. Upload it, match the columns, then click Match and create all. Stay on the page until it finishes.
☐ Check every student has a year and a class
- A student with no year will miss surveys sent to their year group.
- On Wonde, each student also needs a unique school email and a current enrolment date.
☐ Check every staff member is in the right groups
- On Wonde, staff won't import until they're assigned to at least one group.
- Add heads of year to the classes they oversee, not just the year group.
☐ Make the right people admins
- Wonde: tick Admin role required on the Users tab, then sync.
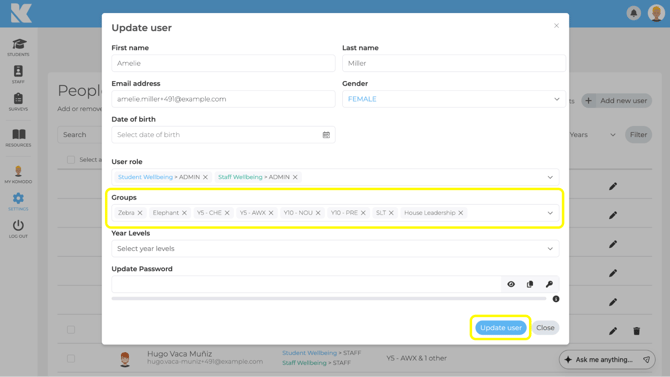
- CSV: go to Settings → People → Edit User and set the role to ADMIN.
- Then add each admin to the groups they need. Being an admin doesn't show every student.
☐ Add any custom groups
- For example houses or focus groups.
- Group names must match exactly. "7b" and "7B" create two separate groups.
Step 3: Start of year, refresh your accounts
Rollover isn't automatic in Komodo. Student history is safe, though. It's linked to each student's school email, so it follows them into their new year and class.
☐ Wonde: sync only after your SIS has been rolled over
- Syncing too early can put students in last year's classes, or in two year groups.
- On the Import page, select this year's classes, deselect last year's, check staff and admins, then click Save and Sync.
☐ CSV: delete last year's class groups before uploading
- A CSV upload adds and updates, but never removes old groups.
- Deleting a group doesn't delete the students or their data.
- Keep any custom groups you still need.
☐ Check leavers have gone and new starters have arrived
- Wonde: leavers are removed automatically once their leaving date passes.
- CSV: delete leavers in Settings → People. There's no restore button, so check first.
☐ Reprint QR codes
- Go to Students → QR Codes → Print. Last year's codes may not work.
☐ Resume any paused surveys
- Paused surveys don't restart on their own.
Last year's data is still in Analytics. Use the timeframe selector at the top left.
Step 4: Check roles and permissions
☐ Confirm who is an Admin and who is Staff
- Use the table below to decide. For more detail, see Admin roles and permissions.
| Admin | Staff | |
|---|---|---|
| Can see | Students in their groups | Students in their groups |
| Surveys | Create, edit and assign | View and preview |
| Users, groups and integrations | Yes | No |
| School-wide settings | Yes | No |
| Check-ins | Can opt out of requested check-ins | Can't opt out. An admin must change their groups |
Other roles:
- Students only see their own data. Parents have no access.
- Staff Wellbeing admins see all staff groups.
- Counsellors get case tools and must use 2FA.
☐ Keep at least two admins
- If your Komodo lead leaves, another admin can hand over.
- If no admin is left, email support@komodowellbeing.com from a school address, with the school's approval.
Step 5: Set up sign-in
☐ Choose your login methods
- Go to Settings → Preferences.
- We recommend SSO for staff and older students, and QR codes for younger students.
☐ SSO: ask us to turn it on, then ask IT to approve Komodo
- Microsoft: grant admin consent to the Komodo Wellbeing SSO app, Application ID
3c402b85-9169-4c20-b917-e964243b38b3. - Google: approve client ID
697087145121-4pbhg8opfck9irq72535sa0h33avve5t.apps.googleusercontent.com, with at least the Google Sign-in scope. - ClassLink: go to Applications → App Library, search for Komodo, then click Add App.
- Approve it for the whole school, or some users will see a "Need admin approval" screen.
☐ Check user emails match their school login
- SSO finds people by email and can't create accounts.
- On Wonde, fix emails in your SIS.
Passwords are reset one at a time in Settings → People → Edit User → Update Password. 2FA can only be reset by Komodo Support.
Step 6: Connect integrations
All integrations live in Settings → Integrations.
☐ Wonde
- If you haven't already, see Step 1.
☐ CPOMS (if you use it)
- Your CPOMS admin creates an API token and identifier in CPOMS, under Admin → Integrations → Komodo Integration.
- Add them in Settings → Integrations → Custom Integration → CPOMS, or send them to us securely.
- Notes only go to CPOMS when staff turn on Send to CPOMS during a check-in follow-up.
- There's no extra cost from Komodo.
☐ Anything else
- For Power BI, Intellischool or our API, contact us.
Step 7: Set up notifications
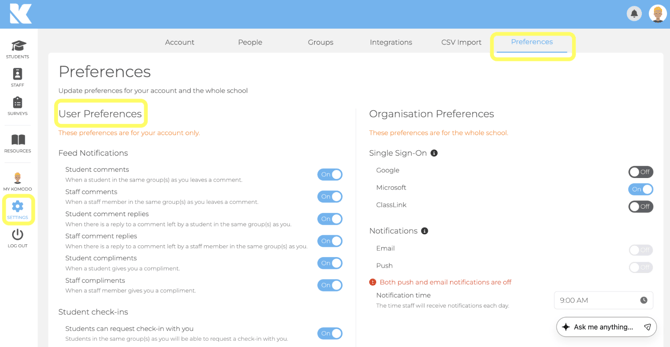
There are two levels. School-wide settings in Settings → Preferences affect everyone. Personal settings in Settings → Preferences → User preferences only affect that person. For full details, see Notifications and reminders.
☐ Turn on email and push notifications for the school
- This makes sure survey reminders reach students on any device.
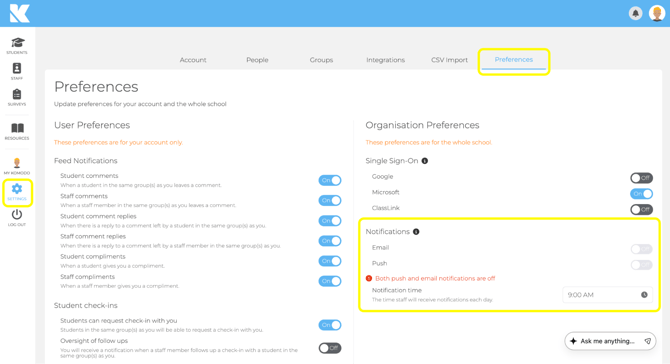
☐ Set the staff and admin notification time
- Pick a time that suits your timetable.
- Student survey times are set on each survey.
☐ Ask admins to adjust their own User preferences
- Admins over many groups can get a lot of emails.
- They should change their personal settings, not the school-wide ones.
☐ Ask IT to allow emails from no-reply@komodowellbeing.com
- This stops Komodo emails going to spam.
What staff are notified about (for students in their groups):
- requested, recommended and Student Safety check-ins
- Feed comments and compliments
- a daily digest of check-ins still waiting
If staff get alerts for students they don't teach, fix their groups rather than their notifications.
Step 8: Staff Wellbeing (if your school has it)
Your School Success Lead sets this up with you, separately from Wonde.
☐ Send the staff details sheet
- Include each person's role and Staff Wellbeing group.
☐ Keep staff groups broad
- For example Leadership, Teaching and Support.
- Results are reported by group, so broad groups protect anonymity.
☐ Choose check-in contacts
- Pick which colleagues staff can request a check-in with.
Step 9: Final checks before your first survey
☐ Spot-check a few students and staff
- Ask one teacher to sign in and confirm they can see their class.
☐ Book staff training
- Book with your School Success Lead, or share the training video.
☐ Share the Staff checklist with all staff
☐ Plan how you'll introduce Komodo to students
- Ask us for the presentation template and intro videos.
Quick fixes
A staff member sees no students
- Check their groups and the filters at the top right, then ask them to sign out and back in.
Changes keep disappearing
- You're on Wonde. Make the change in your SIS or on the Import page.
Students are in the wrong class
- Your SIS may not be rolled over yet, or an old group is still selected.
Someone hasn't synced
- Check they have a unique school email, a selected class, and no past leaving date.
Someone still hasn't synced after those checks
- Staff also need at least one group and no past employment end date.
- Ask IT to check the person isn't excluded from the Komodo app in your Wonde portal.
SIS changes aren't showing yet
- Allow 24 to 48 hours for your SIS change to reach Wonde. Auto-sync then runs once a week.
- To sync sooner, go to Settings → [Your SIS] Import, click Refresh SIS data, then Save and Sync. If you sync before Wonde has the change, run it again later.
Leavers are still showing
- Check their leaving or employment end date is set in your SIS. They're removed at the next sync after that date.
- Ask IT to approve all outstanding Wonde permissions, including pre-admission data, which Komodo needs to remove leavers safely.
You can't edit a user's details
- Users with a Wonde badge are managed by your SIS. Edit their name, email, class or year there, then sync.
Moving from CSV to Wonde
- You won't lose data. Existing users are matched to their SIS records by school email. Stop CSV uploads once Wonde is live.
Changing SIS provider
- Tell your Komodo contact before you switch. Keep the same school email addresses so each user's history carries over.
Still stuck?
- Check the Integrations page for outstanding Wonde permissions and the Errors tab on the Import page.
- Email support@komodowellbeing.com with your SIS name and what you expected to see. Don't include student names or personal details.
- For more detail, see the Wonde integration article in Account Management → Integrations.
